Create a Custom Okta Login Page in Angular
Overview
Okta is a security provider that allows us to quickly implement OAuth 2.0 / OIDC for our own set of applications. The default implementation of a login page is to redirect to the Okta page, and some extra work is involved in creating a custom login page. I will walk you through how to set up a login page for your Okta login in Angular using the okta-auth-js to implement the login and authorization flow.
Setting up the application in your Okta org
My application is set up as an OAuth 2.0 / OIDC application within Okta, which will use the OAuth 2.0 authorization code flow to log in as a user and retrieve an access token and id token. The following is the configuration for my application within Okta:
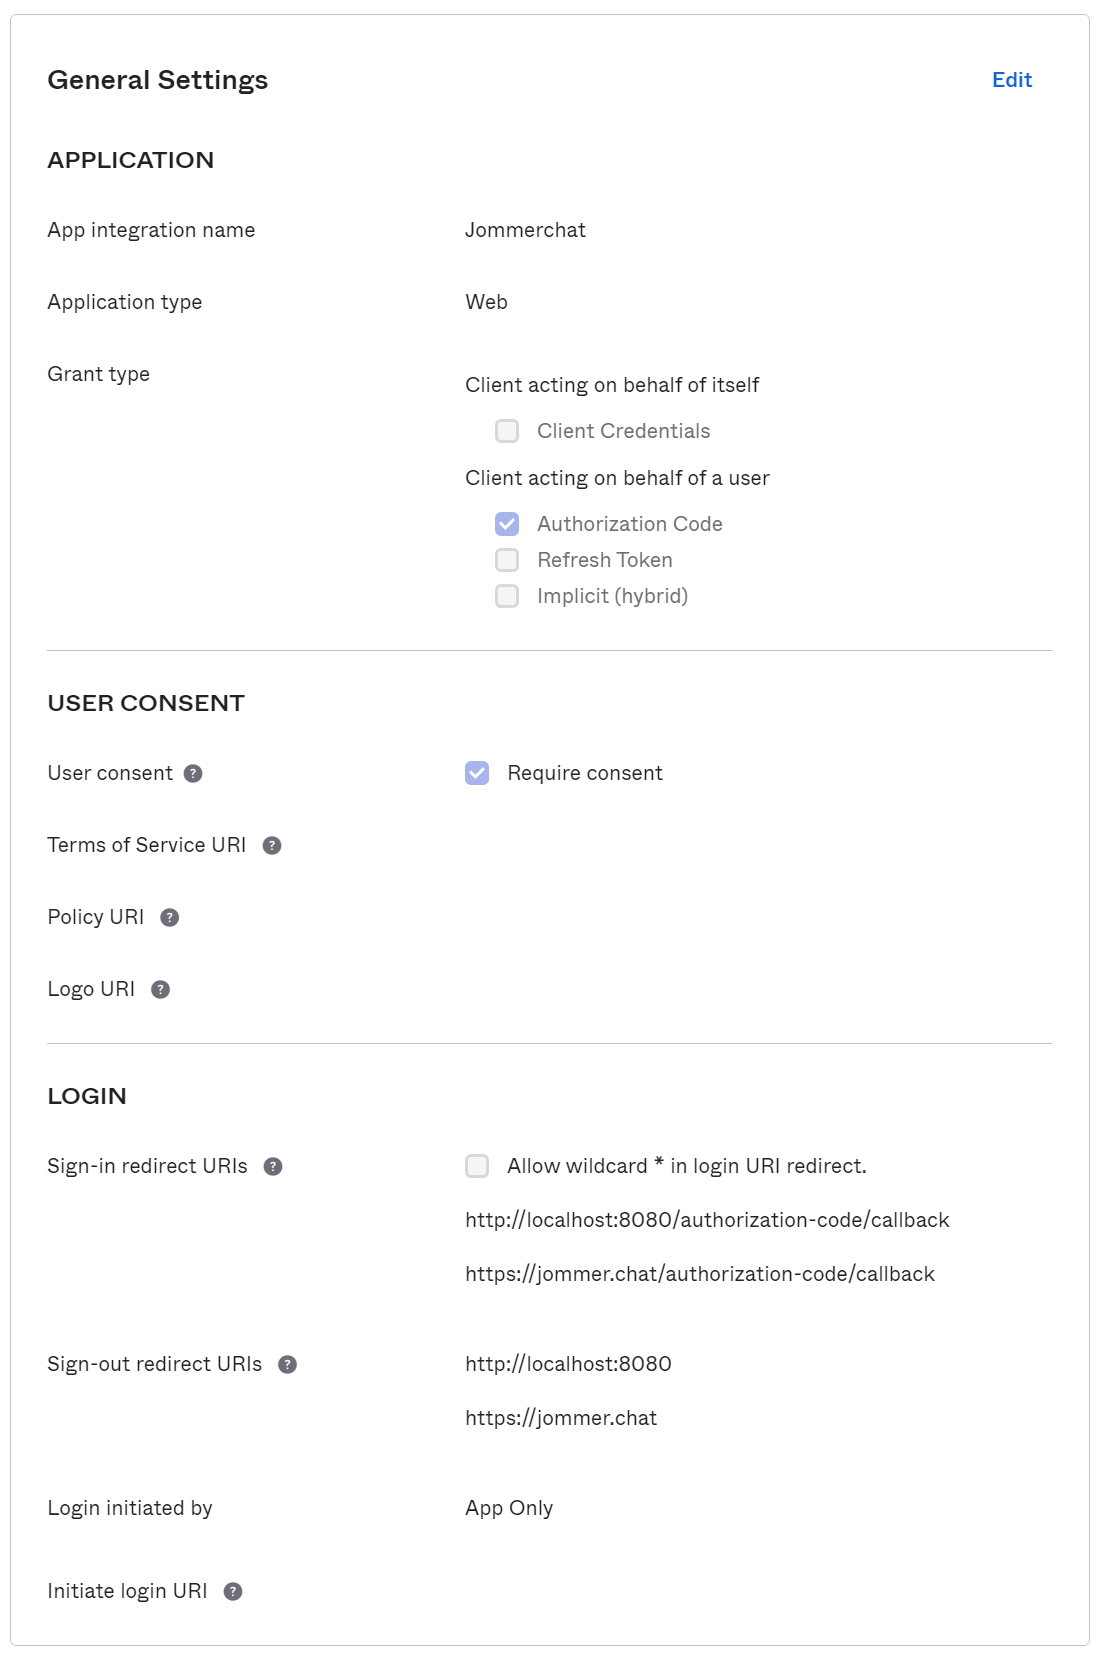
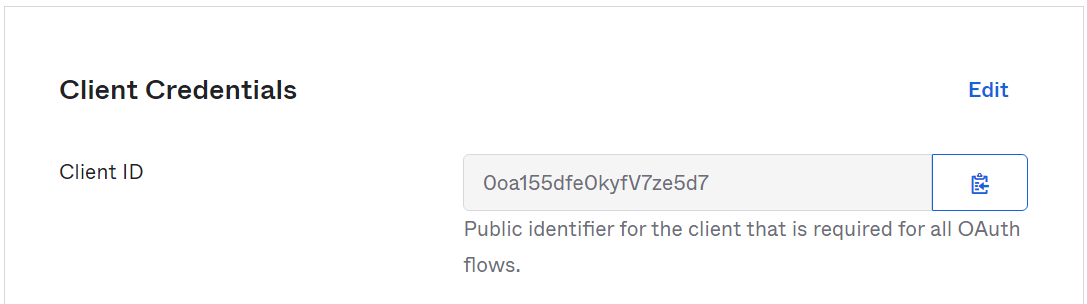
You will need to make a note of your Okta org URL and the sign-in and sign-out redirects so that you can configure those values within your application. You will also want to store your app's client id.
Configuring your Angular Application
Install the @okta/okta-auth-js library to access the basic Okta functions that we will build upon to handle the login/logout of a user.
1npm install @okta/okta-auth-js
We will now add the properties from your Okta org into the environment.ts file so you can access those values anywhere in the app. You will need the issuer URL, clientId, redirect URI, and the scopes you will request. In this case, I am just requesting some default scopes that are available as part of the OpenID specification, and you can add more scopes if needed.
1issuer: 'https://dev-75166832.okta.com/oauth2/default',
2clientId: '0oa156czptZmhqdrv5d7',
3redirectUri: 'http://localhost:8100/login/callback',
4scopes: 'openid profile email',
Creating an Auth Service for communicating with Okta
With the needed Okta environment variables configured, we can create a service class that will handle a user's authentication status and allows them to log in and out. I have created a service called AuthService that will contain the authentication logic. To start working with Okta, we need to create a new instance of OktaAuth, initialized with the variables previously configured in the environment.ts.
1public authClient = new OktaAuth({
2    issuer: environment.issuer,
3    clientId: environment.clientId,
4    redirectUri: environment.redirectUri
5  });
This authClient variable will be accessed by the methods in this service to interact with Okta. The start() method on the authClient will be called in the constructor to start up the object.
1constructor() {
2    this.authClient.start();
3  }
We will make a checkAuthenticated() method that will check if an authentication exists, allowing us to check the authentication status for guarding the navigation of pages.
1async checkAuthenticated(): Promise<boolean> {
2    return await this.authClient.session.exists();
3  }
Now we will create a method() for both login and logout().
 1async login(username: string, password: string): Promise<void> {
 2    const transaction = await this.authClient.signInWithCredentials({username, password});
 3    if (transaction.status !== 'SUCCESS') {
 4      throw Error(`Authentication error occurred with status: ${transaction.status}`);
 5    }
 6    await this.authClient.token.getWithRedirect({
 7      sessionToken: transaction.sessionToken,
 8      responseType: 'id_token'
 9    });
10  }
The login method() takes in a username and password, which should come from a form field on your login page. These values are used to execute the authClient.signInWithCredentials() method will sign in your user with your Okta org. After signing in, either handle the unsuccessful case or wait to grab the session token so that other pages that use the OAuth client to fetch the token will have the value after the login.
The logout() method is a simple invocation of authClient.signOut(), which will remove the user session and direct the user to the logout redirect URL configured in the Okta org.
1async logout(): Promise<void> {
2    try {
3      await this.authClient.signOut();
4    } catch (error) {
5      console.error(error);
6    }
7  }
Now we have a mechanism to allow the user to login and logout, so we need to set up a guard to prevent a user from accessing pages that they shouldn't and an interceptor that will add the access token to all requests so that the backend service that this app calls will have an access token to validate.
Guarding routes in the app based on authentication status
We need a mechanism to prevent users from accessing pages they are not authorized to access. A canActivate guard is used so that only authenticated users are allowed to access the actual application. When the user is authenticated, Angular will activate the route; you can also modify this to check for specific scopes for handling different authorization levels.
 1@Injectable({
 2  providedIn: 'root'
 3})
 4export class AuthGuardService implements CanActivate {
 5
 6  constructor(public authService: AuthService, public router: Router) { }
 7
 8  async canActivate(): Promise<boolean> {
 9    if (!await this.authService.checkAuthenticated()) {
10      await this.router.navigate(['login']);
11      return false;
12    }
13    return true;
14  }
15}
When the user isn't authenticated, the router is used to navigate to the login page; otherwise, it returns true to allow the route to execute. In my example, I apply this guard to my navbar component, which is the parent component of the rest of the components in my app. If this route can't activate, the user can only access the pages related to login and create an account.
1{
2    path: 'navbar',
3    loadChildren: () => import('./features/navbar/navbar.module').then( m => m.NavbarPageModule),
4    canActivate: [ AuthGuardService ]
5  }
Fetching the access token and adding it to requests
Fetching the access token is a key part of working with OAuth2.0 we need to add the access token to every request so that the back-end server can validate the request and know who the user is. An Angular HttpInterceptor will intercept all HTTP requests and will be used to add the access token as a bearer token to all HTTP requests.
 1@Injectable({
 2  providedIn: 'root'
 3})
 4export class AuthInterceptorService implements HttpInterceptor {
 5
 6  constructor(private authService: AuthService) { }
 7
 8  intercept(req: HttpRequest<any>, next: HttpHandler): Observable<HttpEvent<any>> {
 9    req = req.clone({
10      setHeaders: {
11        Authorization: `Bearer ${this.authService.getAccessToken()}`
12      },
13    });
14
15    return next.handle(req);
16  }
17}
A new method() is added to the auth service called getAccessToken() that fetches the access token for the currently authenticated user.
1getAccessToken(): string {
2    return this.authClient.getAccessToken();
3  }
The existing HTTP request being intercepted is modified by cloning the request and adding an Authorization header containing the bearer token that was fetched from the authService. Then the new version of the request is handled. Now all HTTP requests will contain the user's access token as a bearer token.
Connecting a Login Page
All the infrastructures are in place to implement a login system in an Angular app. Implement a simple login form and call the authService.login() method with the username and password, and you will have the capability to log in as a user.
1async submitLogin() {
2    try {
3      this.submitInProgress = true;
4      await this.authService.login(this.username.value, this.password.value);
5    } catch (error) {
6      this.invalidPassword = true;
7      this.submitInProgress = false;
8    }
9  }
The login() method will throw an error when a login is unsuccessful, and you should handle the error and respond to the unsuccessful login attempt. To implement logout, bind the logout() functionality to a logout button, and the user will be redirected to the logout redirect URI configured in the Okta org.
1this.authService.logout();
With all this implemented, you should have a functional login page that you can use to authenticate a user with your Okta org. You can find the code referenced in this guide on Github, and the login code is located in the shared->auth and features->login->login directories.