Launch a Windows Desktop Application from a Browser
Overview
This tutorial will show you how to launch a Windows desktop application from within a browser and how to handle the launch from within an Electron app. In Windows, a custom URI scheme is a method to create a new custom URL protocol that will map to a Windows command by creating a registry key on the local system. After making the registry change, the browser can invoke a Windows command that launches a desktop app. We will use a simple HTML test page and an Electron app to test the browser-to-desktop app flow in this example.
Windows Custom URI Scheme
Windows contains keys within the Registry that let applications register a custom URI that will be used when that URI is invoked on the system. This method is how a mailto link connects to your default mail app and how apps like Zoom and GitHub Desktop can bring up their desktop counterpart from a browser link. An actual application will add this registry key during the installation process, but I will illustrate how to add it manually. The Key Hierarchy for a URI named custom-uri is as follows:
 1HKEY_CLASSES_ROOT
 2	custom-uri
 3		(DEFAULT)
 4		URL Protocol = ""
 5	DefaultIcon(Optional)
 6		(DEFAULT) = ""C:\Users\Johnathan\AppData\Roaming\Zoom\bin\Zoom.exe",1"
 7	shell
 8		open
 9			command
10				(Default) = "Command Text Goes Here"
Open the Registry Editor as administrator and then add a new key under HKEY_CLASSES_ROOT. The name of this key will be the name of the URI that the browser will invoke. In this example, I will be using a URI named custom-uri.
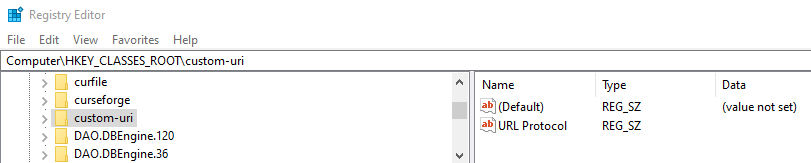
I have created the base key called custom-uri under the root registry key. After creating the base key, you will also need to add a new empty String value within your base key named URL Protocol. This key tells Windows that this is a custom scheme and will allow it to be executed from the browser. After creating the base key, add the following subkeys to run the shell open command to launch your application: shell -> open -> command

The contents of the default value in the command key are the text that will be passed to the shell open command. The contents of the URL that is used to launch the Custom URI Scheme will be passed as an argument to the Registry and can be accessed by referencing %1. Add the absolute path to your executable file and, if needed, pass the URL to the executable.
1"C:\Users\Johnathan\Documents\GitProjects\ElectronCustomUri\ElectronCustomUri-win32-x64\ElectronCustomUri.exe" --protocol-launcher "%1"
It is recommended that you prefix the launch URL with a command line argument so that your desktop application can parse it. This isn't required, but it is easier to handle different launch arguments if your application accepts multiple. In my case --protocol-launcher is used to identify the URL, but --protocol-launcher can be removed from the key to retrieve the URL directly as an argument. With that setup, you should be able to launch your executable from a browser. A DefaultIcon key can also be used to associate your app icon with the URI scheme, but it is not required to get the app launch to work. Change the default string of the DefaultIcon key to "Path/To/App.exe",1, and the icon of your exe will be associated with the URI scheme. That key looks like the following(using zoom as an example):

"C:\Users\Johnathan\AppData\Roaming\Zoom\bin\Zoom.exe",1
You can also easily view the URI schemes for other applications in the registry. The location of the zoom key in the registry: "Computer\HKEY_CLASSES_ROOT\zoommtg"

The custom URI scheme for GitHub Desktop is located at
"Computer\HKEY_CLASSES_ROOT\github-windows"

Launch URI Scheme from a Browser
Now that we have a URI scheme registered, we can launch a URL from the browser and launch the application. The URL has to be invoked by a user action, so you will need to either add it as a link in HTML or bind a line of JavaScript to a button listener to redirect to the URL. Add the following anchor tag to a plain HTML page:
1<a href="custom-uri://launchApplication">Launch Application</a>
You can click this link to launch the application. When you click on that link you should see the following popup box:
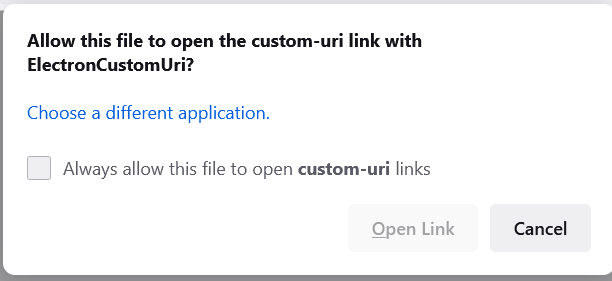
The popup box appears the first time a user invokes the URI scheme being launched and will include the name of the exe you linked your URI scheme too. If the user clicks the checkbox and opens the link, successive invocations of the scheme will not require an additional click. You should be able to open the link and see your exe launch. The second method for invoking the URI scheme from the browser is to bind some JavaScript to a button that will change the window location href to the app launch URL, which will open the desktop application. That looks like the following:
1<body>
2        <button>Custom URI Button</button>
3    </body>
4    <script>
5        const button = document.querySelector('button');
6        button.addEventListener('click', () => {
7            window.location.href = 'custom-uri://launchApplication'
8        });
9    </script>
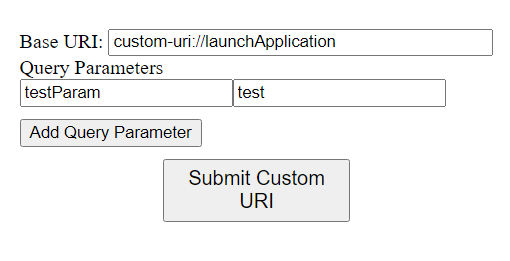
I have created a utility html file that can be used to test that a registry key is setup correctly and to test the behavior of a desktop app when it is passed different data on the url. That test harness can be found on GitHub
Handling a Custom URI Launch from an Electron Desktop Application
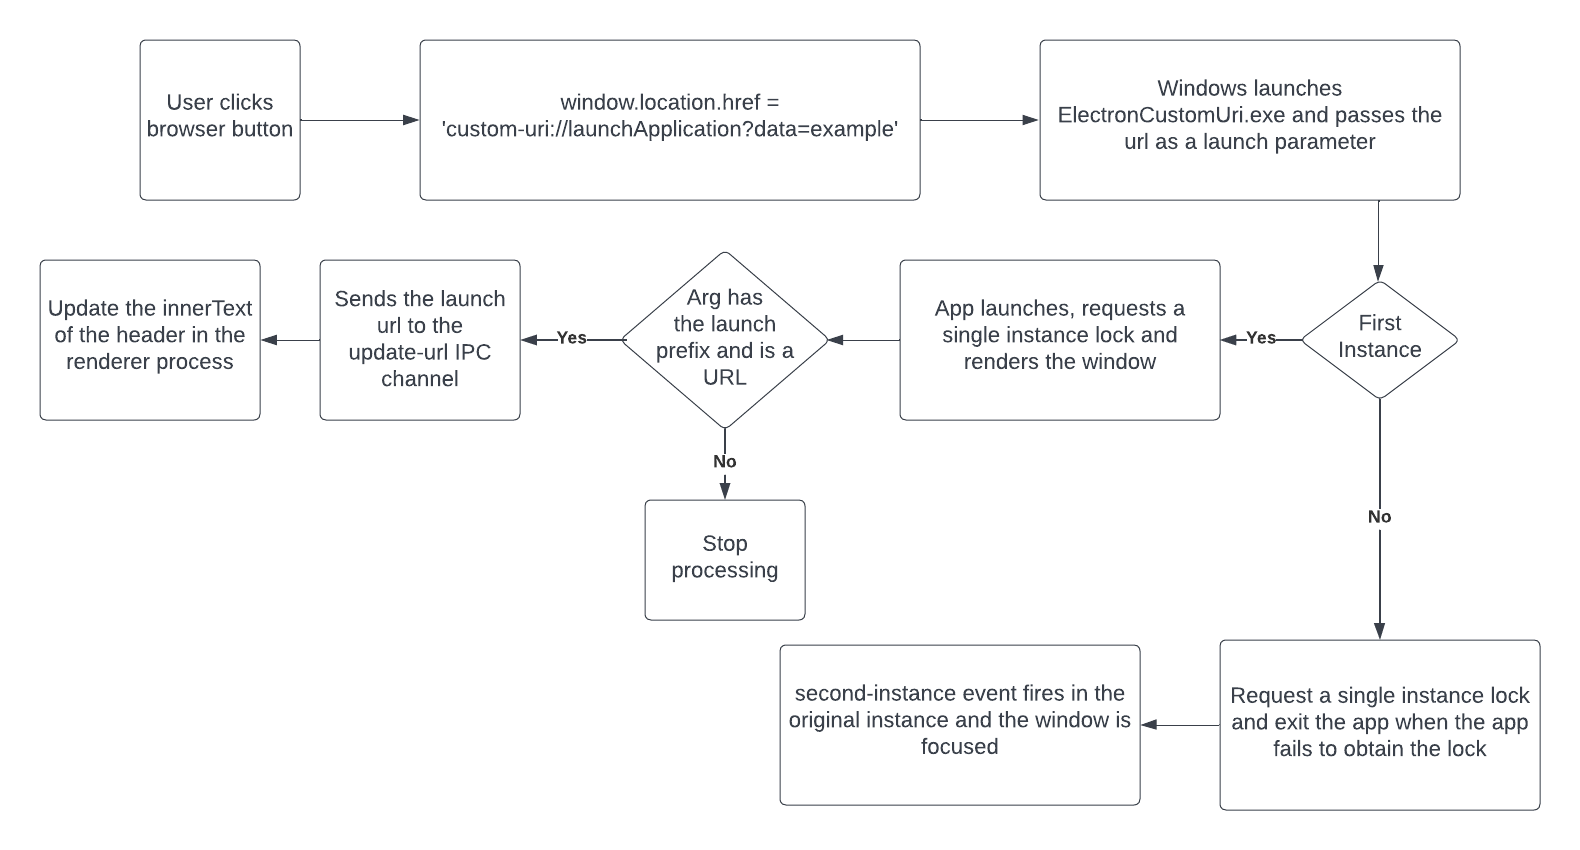
Now that the registry key is set up and we have a way to invoke our application from the browser, we need to handle the launch and grab the URL that launched the application. Since the URI scheme opens the exe, Windows will open a new instance of the exe every time. This behavior isn't desirable for most implementations, and some code is needed to handle multiple app instances and only allow one application instance to be launched. How this implemented changes depending on the technology, but the instances of the desktop app will need to communicate with each other to limit the number of instances that can be opened and pass the url to the original instance of the application. The following diagram shows the process flow for launching a link in the browser to launch an electron app and modify content in the renderer based on the data passed during the launch:
I have made a simple Electron app that illustrates how to handle multiple instances and update the state of the UI based on the app launch. The code for that is available on Github.
This app consists of a simple page that contains a header that by default says "Hello World!" and a window is created in the main file that uses a preload script called preload.js that allows the renderer process to have access to a method that will respond to an IPC channel when the app is launched with some data.
 1const createWindow = async () => {
 2    const win = new BrowserWindow({
 3        webPreferences: {
 4            preload: path.join(__dirname, "preload.js")
 5        },
 6        width: 800,
 7        height: 600
 8    })
 9
10    await win.loadFile('index.html')
11    return win
12}
Handling Multiple Instances
On initial app startup, the Electron app uses the requestSingleInstanceLock() method provided in the Electron app object that will either return true or false if the app obtains the lock. This value is used to determine whether or not the current instance is a duplicate instance. If this is a duplicate instance, the app quits. The first instance creates the window, and the launch arguments are processed. The app also registers an event handler for the second-instance event, allowing the window to become focused when the app is launched and handle any launch parameters that Windows passed to the exe.
 1const appLock = app.requestSingleInstanceLock()
 2
 3if(!appLock) {
 4    app.quit()
 5} else {
 6    app.whenReady().then(async() => {
 7        mainWindow = await createWindow()
 8        handleProtocolLauncherArgs(process.argv)
 9    })
10
11    app.on('second-instance', (event, args, workingDirectory) => {
12        console.log('second instance')
13        // Someone tried to run a second instance, we should focus our window.
14        if (mainWindow) {
15            if (mainWindow.isMinimized()) {
16                mainWindow.restore()
17            }
18
19            if (!mainWindow.isVisible()) {
20                mainWindow.show()
21            }
22
23            mainWindow.focus()
24        }
25
26        handleProtocolLauncherArgs(args)
27    })
28}
The handleProtocolLauncherArgs() method validates whether the arguments passed in should be handled as a launch URL. Then the handleAppUrl() method is invoked to pass the URL to the renderer process. The following code snippet shows that method, which is partially borrowed from the Github Desktop code base. The arguments are filtered such that each argument is parsed as a URL and that the URL is of one of the desired protocols. If there is a single matching URL, the URL is passed to the handleAppUrl() method that passes the data to the renderer.
 1const protocolLauncherArg = '--protocol-launcher'
 2const possibleProtocols = new Set(['custom-uri'])
 3
 4function handleProtocolLauncherArgs(args) {
 5    // Received possible protocol arguments
 6    if (isWin) {
 7        // Desktop registers it's protocol handler callback on Windows as
 8        // `[executable path] --protocol-launcher "%1"`. Note that extra command
 9        // line arguments might be added by Chromium
10        // (https://electronjs.org/docs/api/app#event-second-instance).
11        // At launch Desktop checks for that exact scenario here before doing any
12        // processing. If there's more than one matching url argument because of a
13        // malformed or untrusted url then we bail out.
14
15        const matchingUrls = args.filter(arg => {
16            // sometimes `URL.parse` throws an error
17            try {
18                const url = URL.parse(arg)
19                // i think this `slice` is just removing a trailing `:`
20                return url.protocol && possibleProtocols.has(url.protocol.slice(0, -1))
21            } catch (e) {
22                log.error(`Unable to parse argument as URL: ${arg}`)
23                return false
24            }
25        })
26
27        if (args.includes(protocolLauncherArg) && matchingUrls.length === 1) {
28            handleAppUrl(matchingUrls[0])
29        } else {
30            log.error(`Malformed launch arguments received: ${args}`)
31        }
32    } else if (args.length > 1) {
33        handleAppUrl(args[1])
34    }
35}
The handleAppUrl() method sends the URL to the renderer through the mainWindow object, which is then handled by the renderer.
1function handleAppUrl(url) {
2    //Handle your url here, in this case we will just display the app url in the page
3    //this is communicated to the UI using an IPC channel to the mainWindow
4    mainWindow.webContents.send("update-url", url)
5}
The renderer changes the header to equal the URL passed in by the app launch.
1const header = document.querySelector('h1')
2window.electronAPI.handleAppLaunch((event, value) => {
3    header.innerText = value;
4})
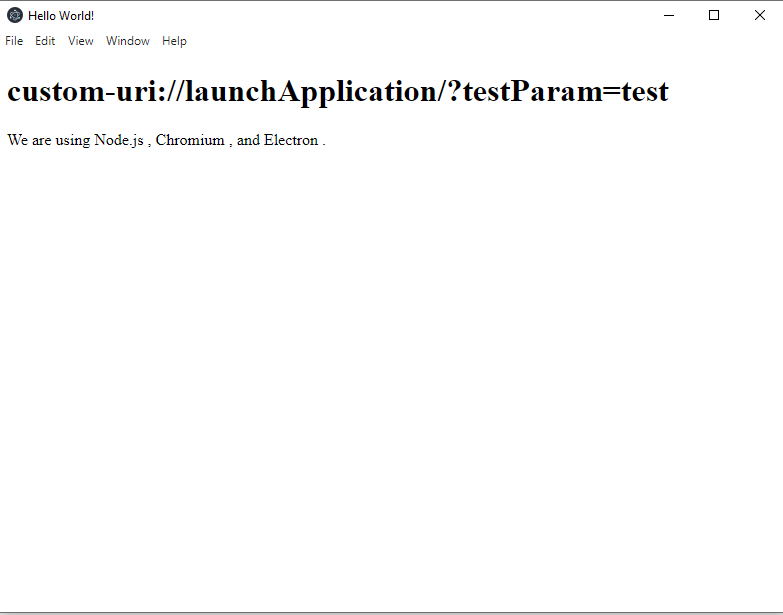
The final result of this is that there is a single Electron window that starts out looking like the following:
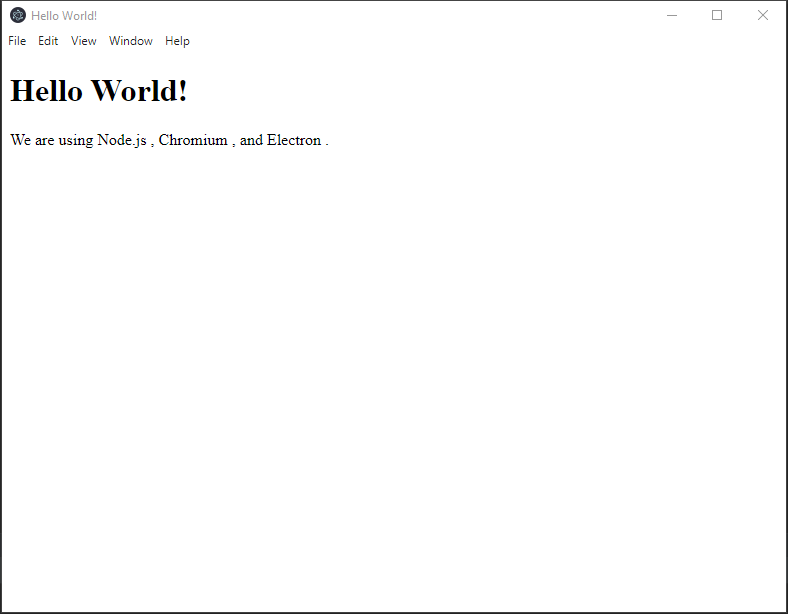
Using my UriScheme tester, I can add some data to the URL and submit it, and the page will update.
The page updates and the header value changes to the URL that launched the app
At this point, only one instance of the app will be open at a time, and the URL that launched the app is passed to both the main process and the renderer process, allowing you to use the data however you want. The method used here for handling multiple instances is unique to Electron, and the methods will vary depending on the desktop application development platform. Some platforms will not include an instance management system, and the developer will have to pass the data from the new instance to the original instance through inter-process communication.